
百度Apollo自动驾驶系统之cyberRT编程:Component实践
参考文献:https://apollo.baidu.com/community/Apollo-Homepage-Document
以及Apollo方面课程
一、Component概念
Cyber RT是一个高性能、高吞吐、低延时的计算运行框架,其中,动态加载技术和有向无环图(DAG)是其实现高性能重要途径之一。
Cyber RT采用了基于Component模块和**有向无环图(DAG)**的动态加载配置的工程框架。即将相关算法模块通过Component创建,并通过DAG拓扑定义对各Component依赖关系进行动态加载和配置,从而实现对算法进行统一调度,对资源进行统一分配。采用这个工程框架可以使算法与工程解耦,达到工程更专注工程,算法更专注算法的目的。
- Node: cyberRT中的基本组成单元
- Reader/Writer: Channel中的消息读写类
- Channel: cyberRT中组件间的数据通信总线
- DAG: cyber用于描述整个计算拓扑
二、Component类型
基类都为ComponentBase
1. 数据驱动的Component
支持一路或多路数据输入,当Proc所需要的数据全部Ready后由Scheduler封装的Proc函数和数据并在Thread Pool中执行**(最高四路消息融合)**
例子:
1 | template <typename M0, typename M1, typename M2, typename M3> |
当从多个Channel读取数据的时候,以第一个Channel为主Channel。当主Channel有消息到达,cyberRT会调用Component的Proc()进行一次数据处理
2. 时间驱动的TimerComponent
支持最小2ms精度的Timer,由时间轮驱动,每隔一定的时间执行一次Proc函数
例子:
1 | bool TimerComponent::Initailize(const TimerComponentConfig& config) { |
与普通Component不同,TimerComponent根据传入的配置信息,间隔一定的时间触发一次
三、Component基本实现
1. 定义Component
ComponentSample.h
1 |
|
2. 加载Component
所有的Component会被编译为.so文件,cyberRT会根据配置文件按需加载对应的Component,所以我们需要为Component编写好对应的.dag和.launch文件
cyberRT提供了两种加载Component的方式,分别为cyber_launch和mainboard
其中cyber_launch会启动对应的**.launch文件,mainboard会启动对应的.dag**文件
- 通过launch启动
如图是雷达的launch模块:
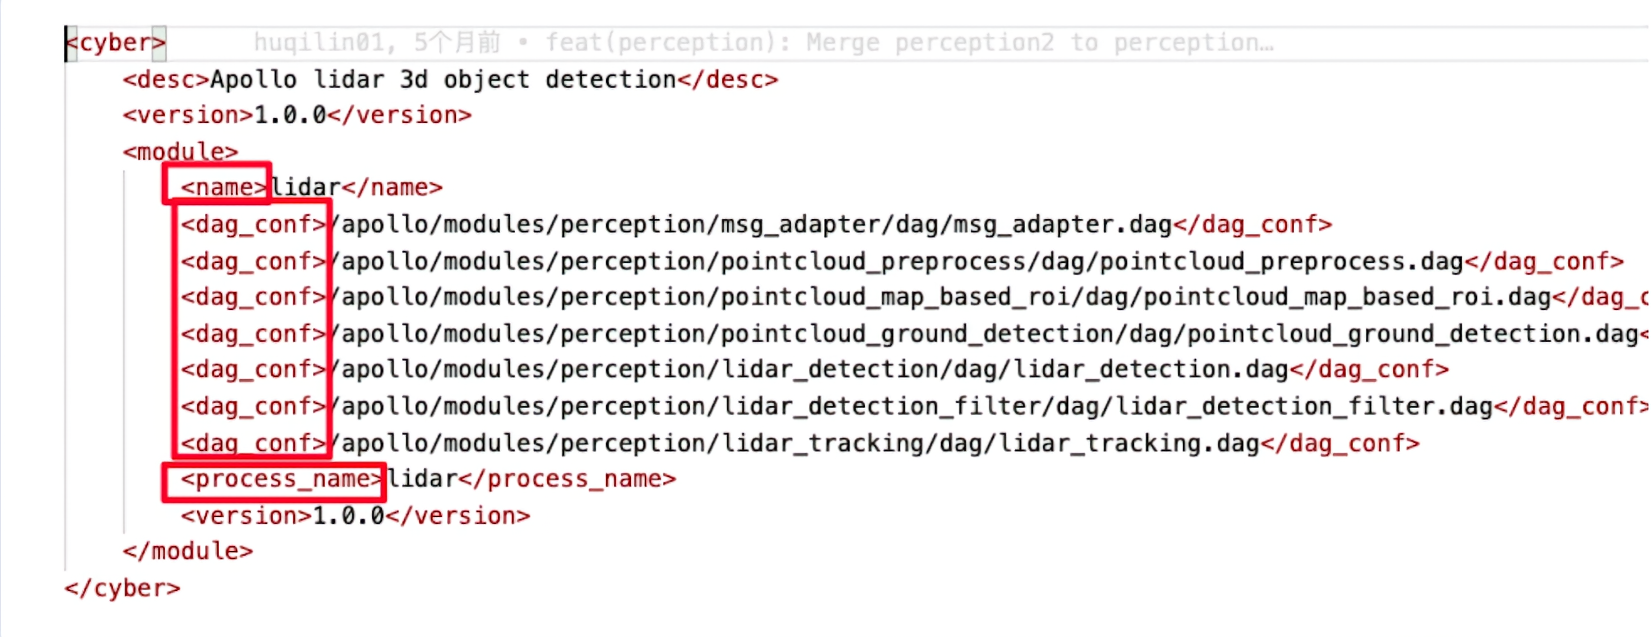
process_name: 进程名(mainboard进程一旦启动的名称,与process_name相同的component将在同一进程中加载并运行)
dag_conf: 配置的dag文件
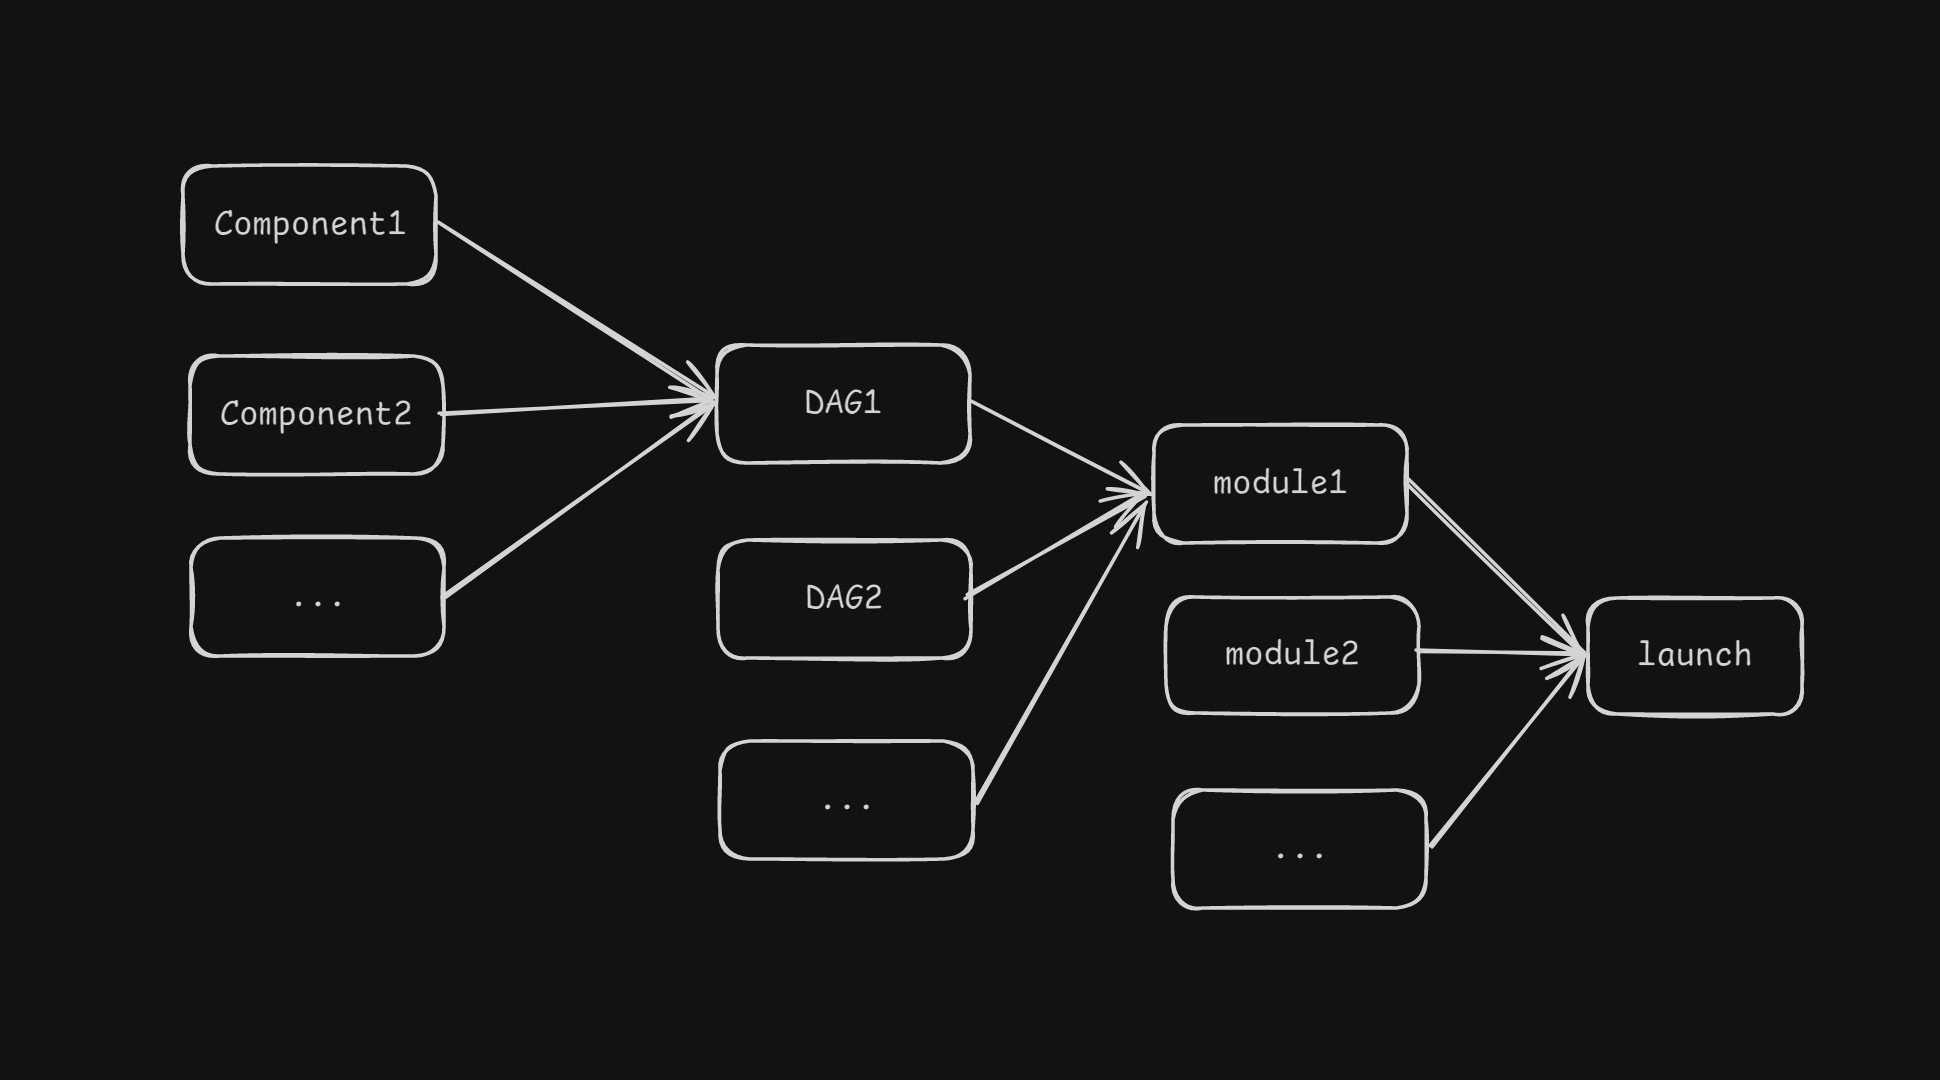
Component, dag, module和launch关系如下:
- 通过dag文件启动
如图是PlanningComponent的dag文件
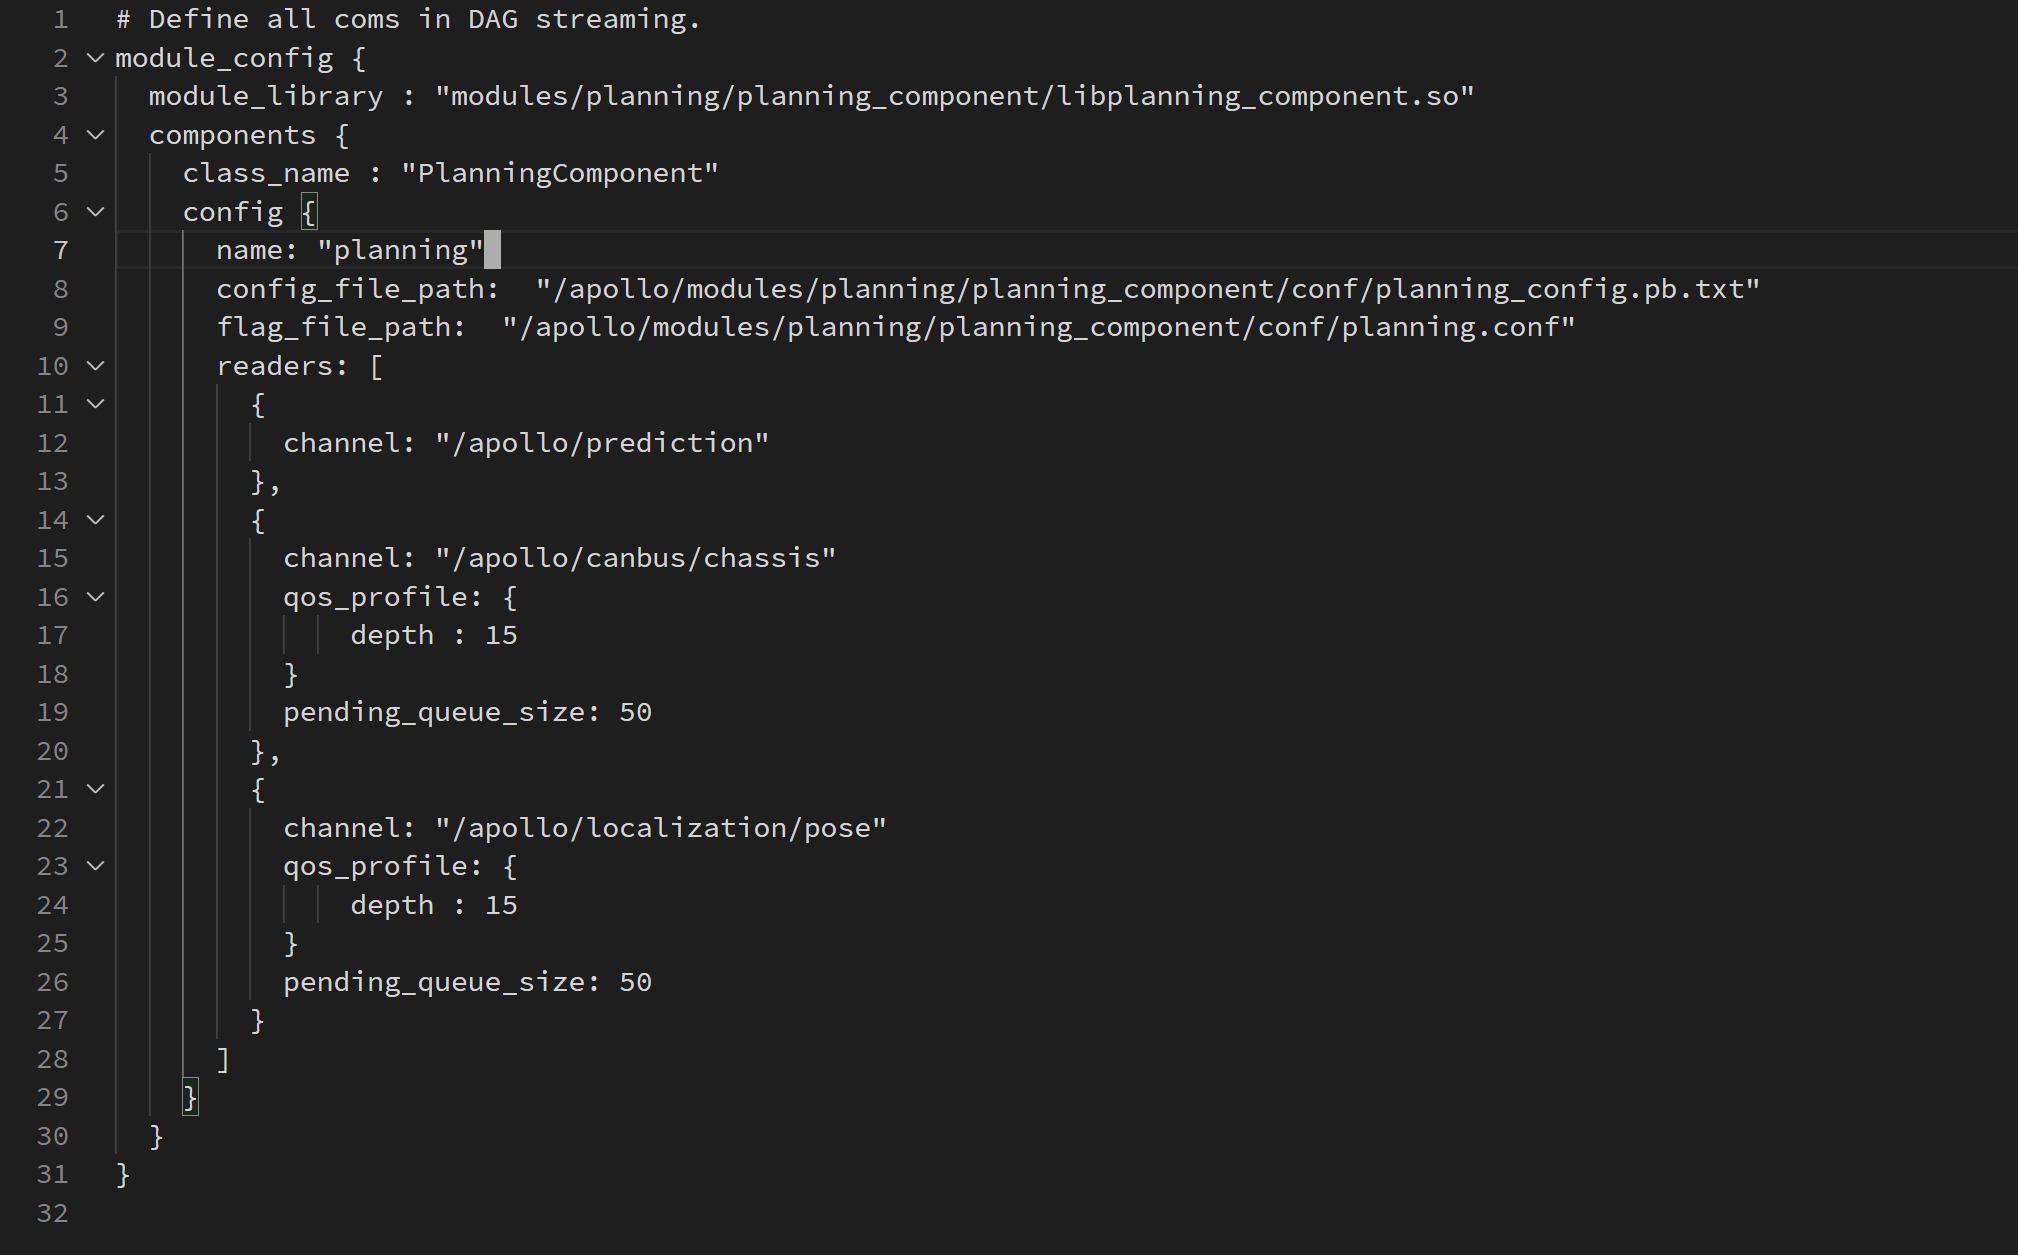
该文件定义了.so文件的位置为modules/planning/planning_component/libplanning_component.so
该模块输入三个channel的消息,分别是/apollo/prediction,/apollo/canbus/chassis和/apollo/localization/pos
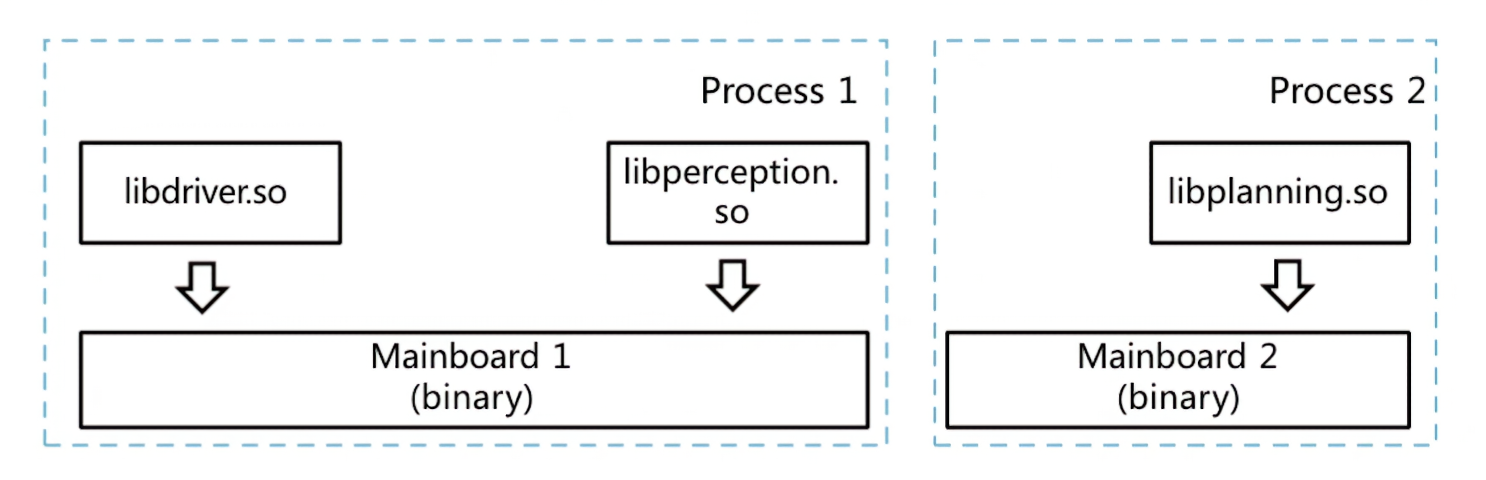
mainboard具有动态加载的特性,mainboard作为程序主体启动,通过读取参数中的dag配置文件,加载对应的动态库so,并初始化对应的component类
mainboard可以同时启动多个,并分别加载不同的component,不同mainboard间通讯等功能均不受影响
3. Component的底层调度与实现
协程
此部分以后再补充
四、TimerCompoent实践
1. 创建TimerComponent
1 | buildtool create --template timer_component component/sensor_component |
观察创建的component目录
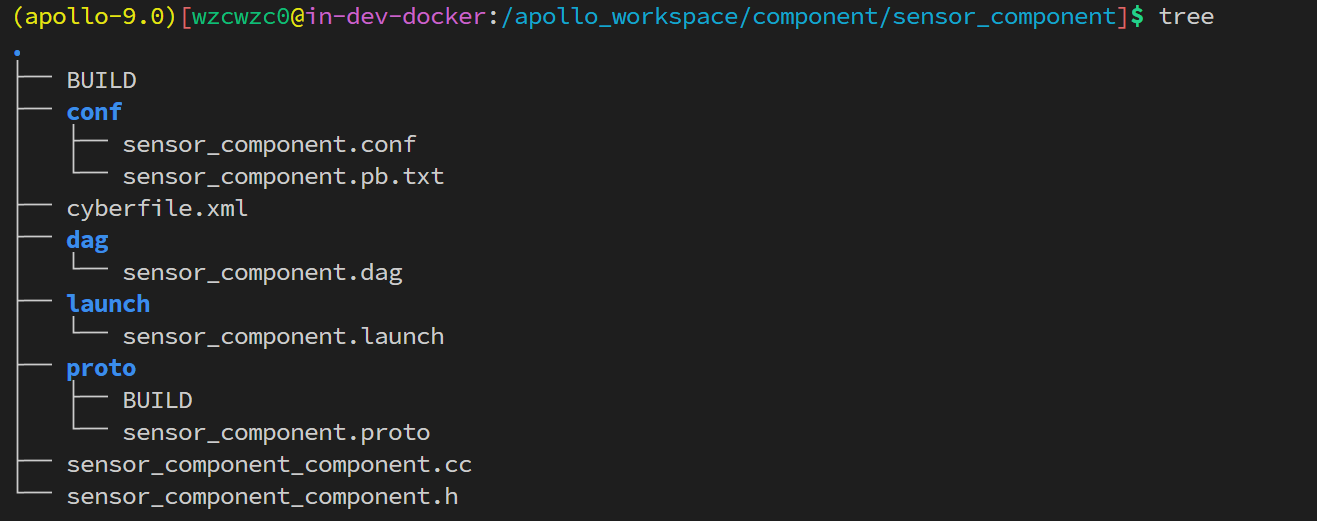
BUILD文件为当前Component的源码编译规则文件conf/sensor_component文件为全局变量配置文件,需要配合gflags文件使用conf/sensor_component.pb.txt文件为用户在proto文件中定义的可配置项的配置文件cyberfile.xml文件为该Component的描述文件dag/sensor_component.dag文件描述了该Component的拓扑关系launch/sensor_component.launch文件为launch启动文件proto/sensor_component.proto文件定义了该Component所要用到的数据类型
2. 定义消息结构
定义proto消息:
proto/sensor_component.proto
1 | syntax = "proto2"; |
定义消息的可配置项进行配置:
conf/sensor_component.pb.txt
1 | name: "sensor-component_test" |
3. 编写源码并编译
首先为了方便使用Time和Writer模块,我们先在头文件里引入这两个命名空间
在sensor_componet_component.h里面加入
1 | using apollo::cyber::Time; |
接下来需要一个Writer的智能指针,在SensorComponent的private域里添加一个智能指针:
1 | private: |
然后我们需要在Init函数中根据我们定义的topic名称,对Writer这个智能指针进行初始化:
1 | writer_ = node_->CreateWriter<SensorComponentMsg>(config_.sensor_topic().c_str()); |
在Proc()函数里可以对进行数据处理并输出到writer_
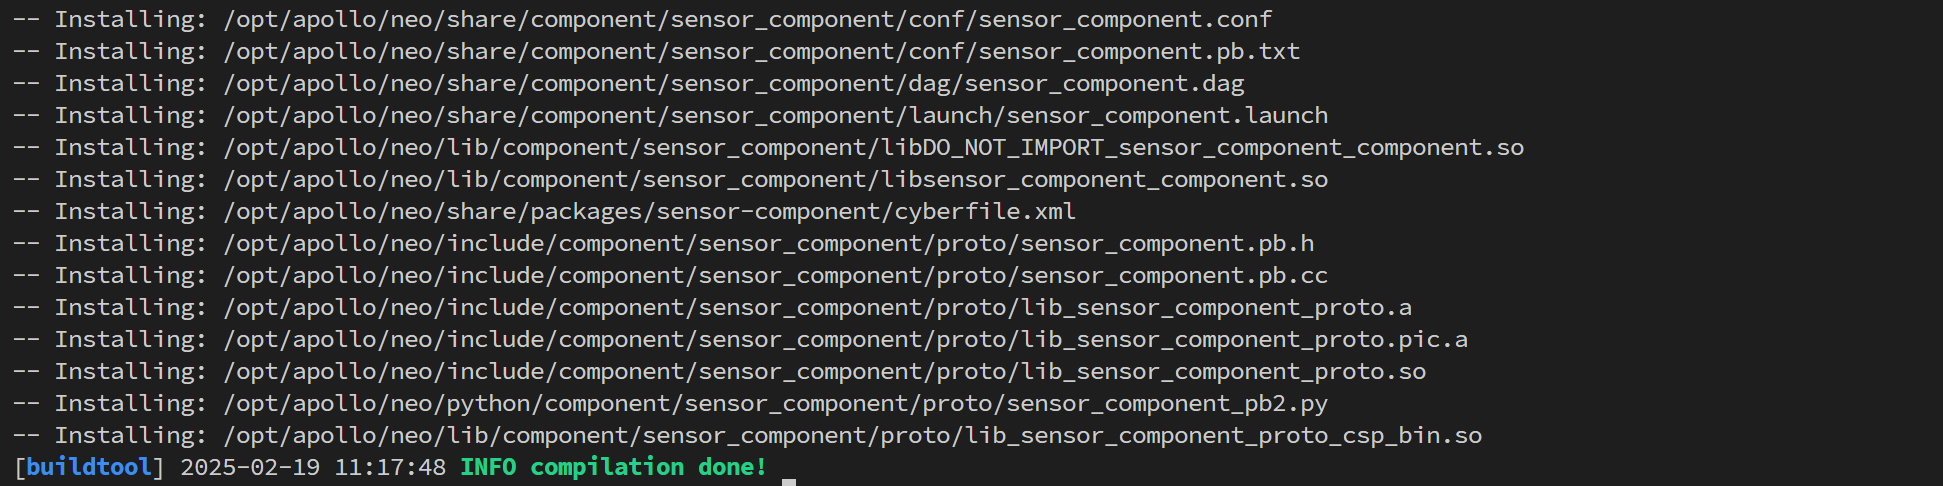
此时可以对该源码进行编译
1 | buildtool build -p component/sensor_component |
看到如下即为成功:
4. 文件配置
打开dag/sensor_component.dag文件,把其中的interval改为500,即为每500ms运行一次
1 | module_config { |
同时修改launch/sensor_component.launch的<dag_conf>标签,前加上./
5. 查看运行结果
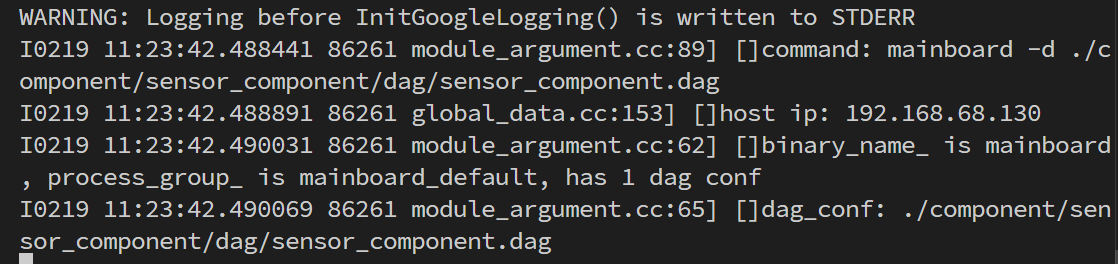
- 使用mainboard工具启动
1 | mainboard -d ./component/sensor_component/dag/sensor_component.dag |
看到如下即为启动成功:
此时在cyber_monitor中可以看到该topic

继续按下键盘右键可以看到该channel目前的消息

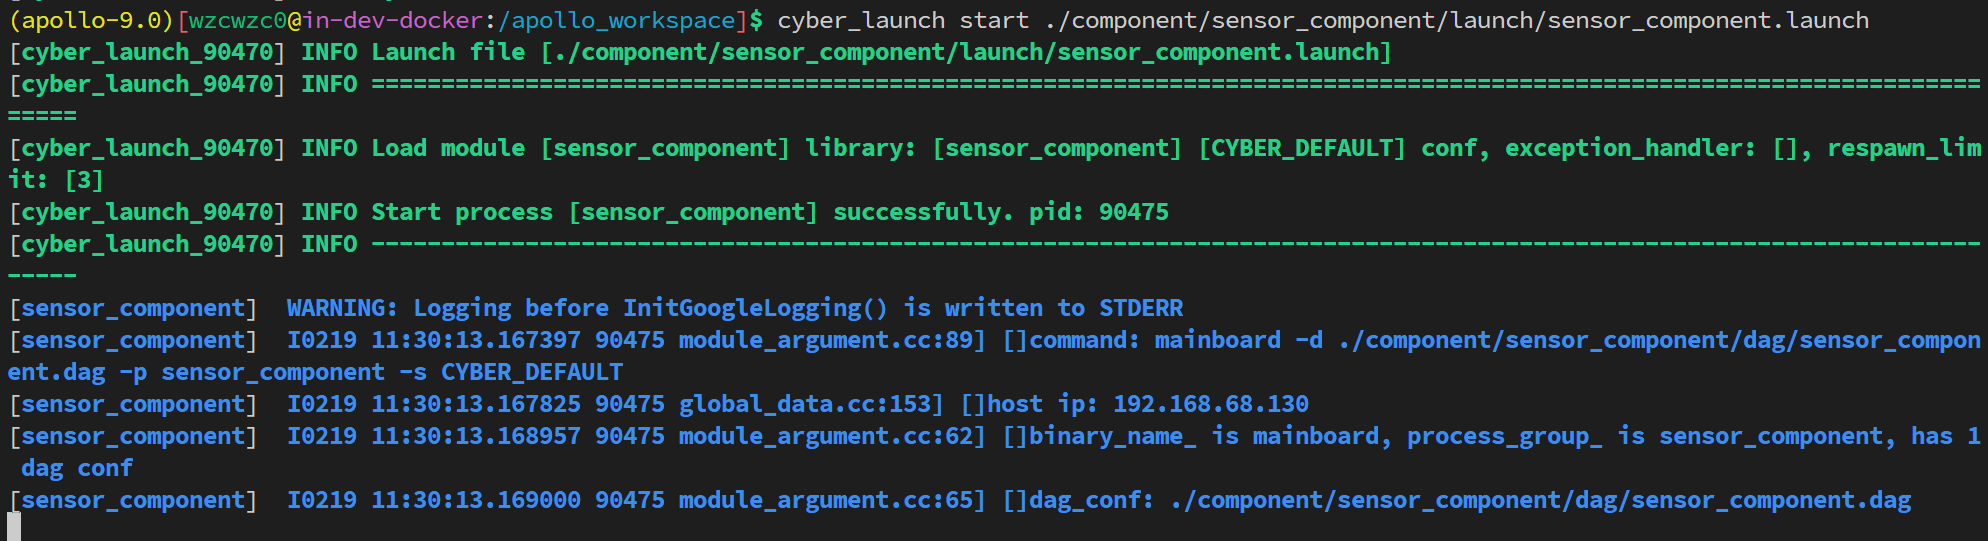
- 使用cyber_launch工具启动
1 | cyber_launch start ./compont/sensor_component/launch/sensor_component.launch |
看到如下即为成功:
同样可以通过cyber_monitor看到topic已经启动,同时可以使用cyber_channel工具进行精细调试

五、融合消息Component实践
我们将尝试将上一个Component输出的消息进行融合处理
在上一个sensor_component的Proc()函数中添加如下处理内容
1 | static int i = 0; |
并重新编译部署,这一章节不再赘述。
1. 创建融合Component
1 | buildtool create --template component component/fusion_message |
fusion_message目录结构与第四章节的TimerComponent类似,不再赘述
2. 定义消息结构
定义proto消息:
proto/fusion_message.proto
1 | syntax = "proto2"; |
定义消息的可配置项进行配置:
conf/fusion_message.pb.txt
1 | name: "fusion_message" |
3. 编写源码并编译
首先因为我们需要融合sensor_component的消息,所以要引入头文件
1 |
同时将class FusionMessage final : public cyber::Component<apollo::FusionMessageMsg>这一行改为从SensorComponentMsg获取融合信息:
1 | class FusionMessage final : public cyber::Component<apollo::SensorComponentMsg> |
将Proc()函数的传入参数改为两个SensorComponentMsg类型的指针(同时注意在cc文件的实现中也需要修改):
1 | bool Proc(const std::shared_ptr<apollo::SensorComponentMsg>& msg0) override; |
为了方便使用Time和Writer模块,我们在头文件里引入这两个命名空间
在fusion_message_component.h里面加入
1 | using apollo::cyber::Time; |
接下来需要一个Writer的智能指针,在SensorComponent的private域里添加一个智能指针:
1 | private: |
然后我们需要在Init函数中根据我们定义的topic名称,对Writer这个智能指针进行初始化:
1 | writer_ = node_->CreateWriter<FusionMessageMsg>(config_.fusion_topic().c_str()); |
在Proc()函数里可以对进行数据处理并输出到writer_
1 | bool FusionMessage::Proc(const std::shared_ptr<SensorComponentMsg>& msg0) { |
修改BUILD文件,由于源文件中包含了component/sensor_component/proto/sensor_component.pb.h,需要在编译的依赖项中添加对应的项
1 | load("//tools:apollo_package.bzl", "apollo_cc_library", "apollo_cc_binary", "apollo_package", "apollo_component") |
此时可以对该源码进行编译
1 | buildtool build -p component/fusion_message |
看到如下即为成功:

4. 文件配置
打开dag/sensor_component.dag文件,修改两个reader,分别都从/sensor/test中读取数据
1 | module_config { |
同时修改launch/sensor_component.launch的<dag_conf>标签,前加上./
5. 查看运行结果
与第四章类似的方法通过mainboard或者cyber_launch启动
通过cyber_monitor或cyber_channel查看结果

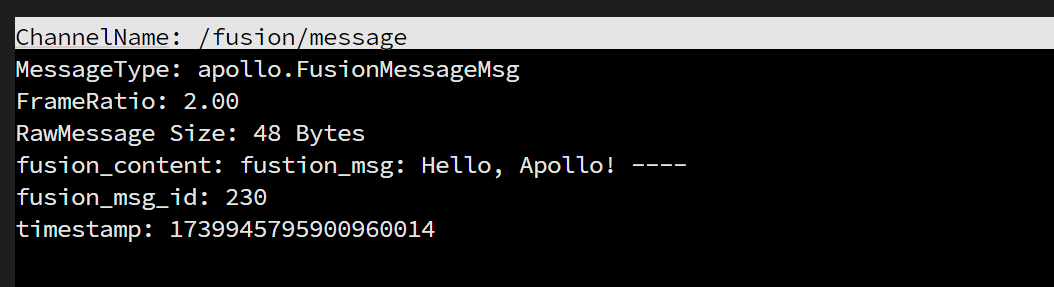
观察到两个通道均有结果,同时/fusion/message也输出的是正确的处理过的信息:
六、另外的问题
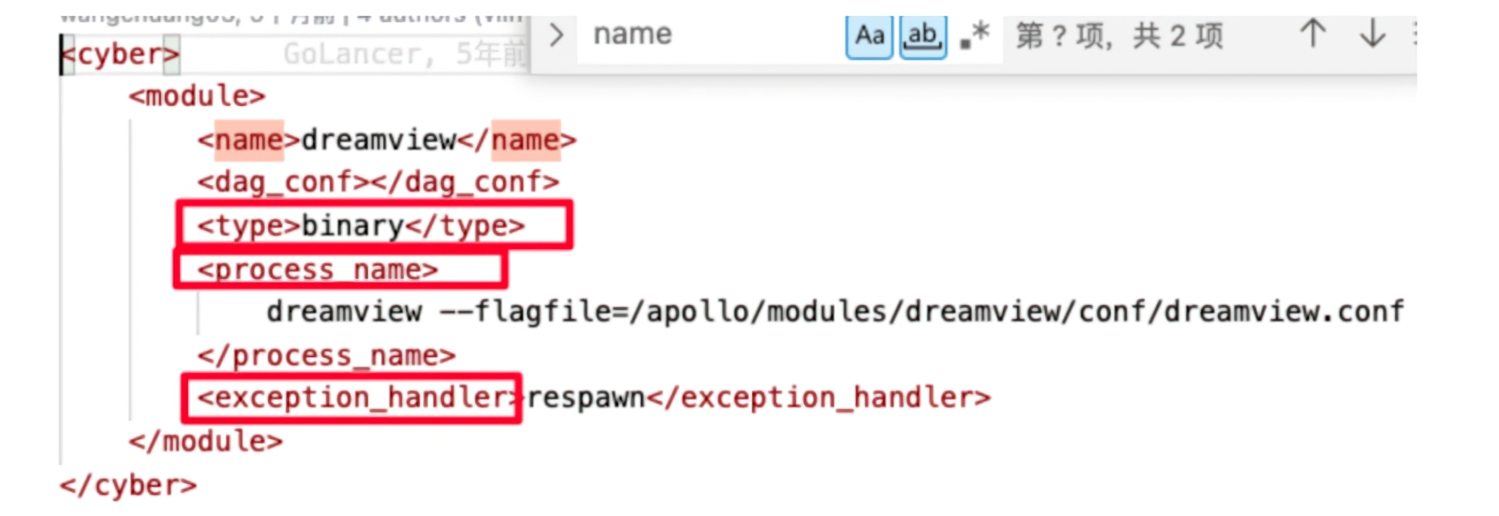
1. cyber_launch可调用其他二进制程序
例如下面这个例子:
-
type类型: 是启动二进制文件还是dag文件
-
exception_handler: 异常处理方法
exit: 进程异常时退出,整个进程停止运行
respawn: 进程退出后需要重新启动
2. cyber_monitor工具
运行命令:
1 | cyber_monitor |
可以看到目前Apollo的所有通道。可通过键盘的PageUp和PageDown翻页,同时也可以按下右键查看目前通道情况


按下Ctrl-C终止
3. cyber_channel工具
运行命令:
1 | cyber_channel -h |
可以看到该命令所有的功能
-
cyber_channel list:列出目前的所有活动的通道
-
cyber_channel info:列出当前通道的所有信息
-
cyber_channel echo:将当前通道的输出输出到屏幕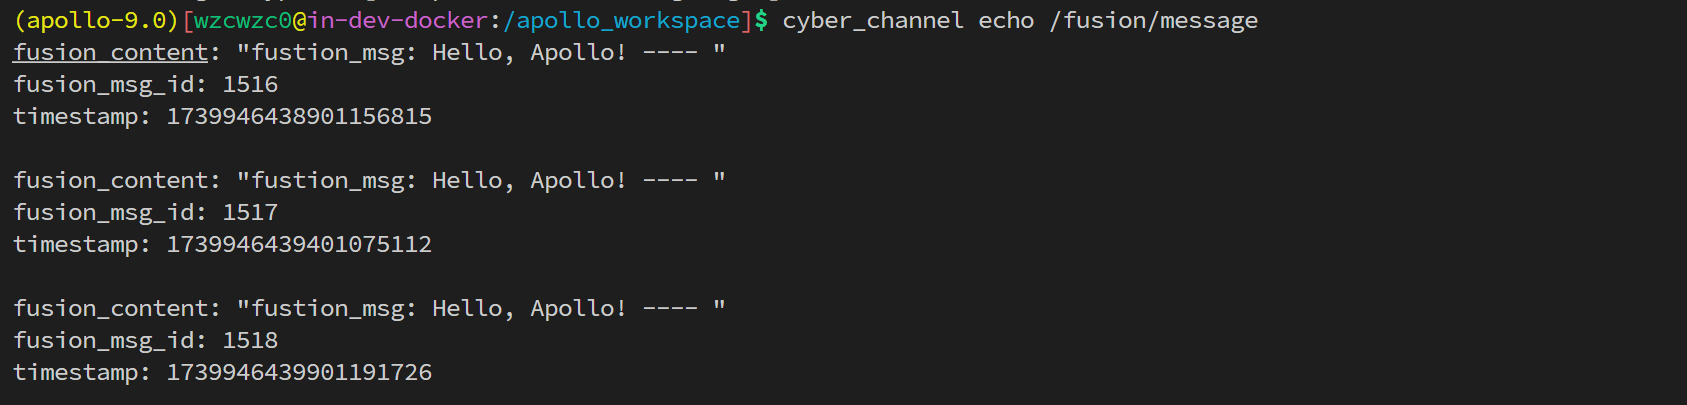
-
cyber_channel hz:输出当前通道输出速率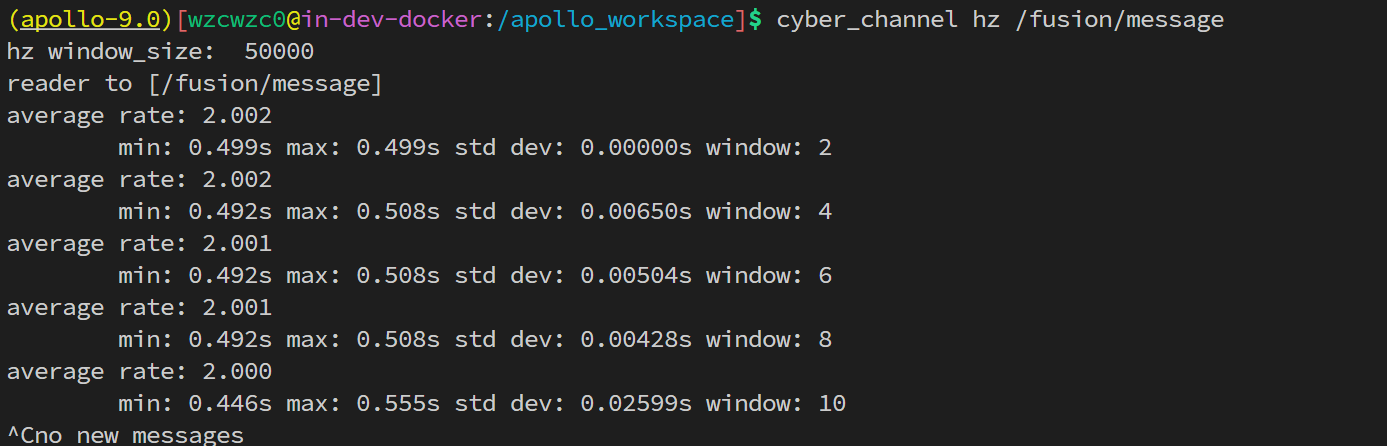
-
cyber_channel bw:输出当前通道的数据量速率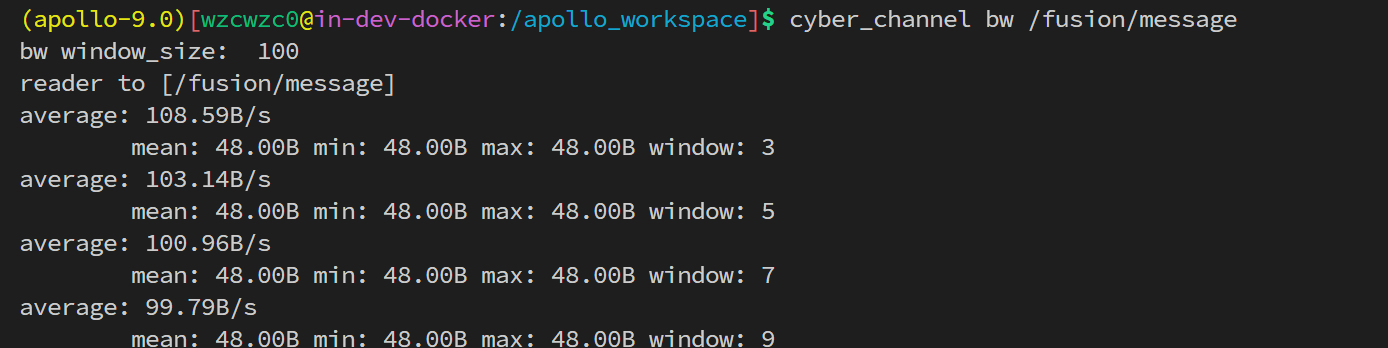
-
cyber_channel type:输出当前通道的通道种类