百度Apollo自动驾驶系统之cyberRT编程:通讯机制实践
参考文献:https://apollo.baidu.com/community/Apollo-Homepage-Document
以及Apollo方面课程
一、通信机制
按方式分类:
- 基于Writer/Reader的通信方式
- 基于C/S的通信方式
- 基于参数服务
按作用域分类:
- 进程内通信(对象指针,函数)
- 进程间通信(共享内存,管道,消息队列)
- 跨主机通信(RTPS、GRPC)
cyberRT使用的通信方式:进程内采用INTRA(函数与指针),进程间采用SHM(共享内存),跨主机通信采用RTPS(实时发布订阅的网络通信协议)
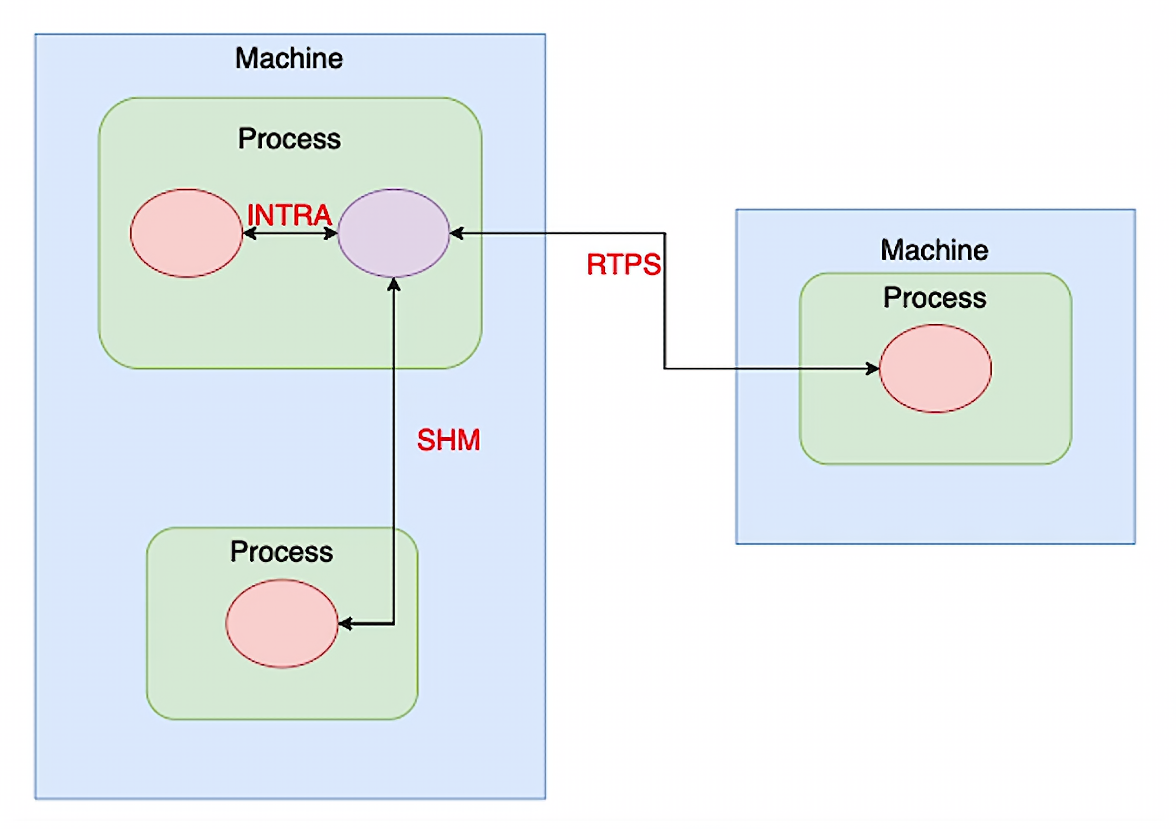
此外还有一种由Apollo决定的混合通信方式,根据对端的IP和进程PID信息决定采用什么方式进行通信,称为Hybrid
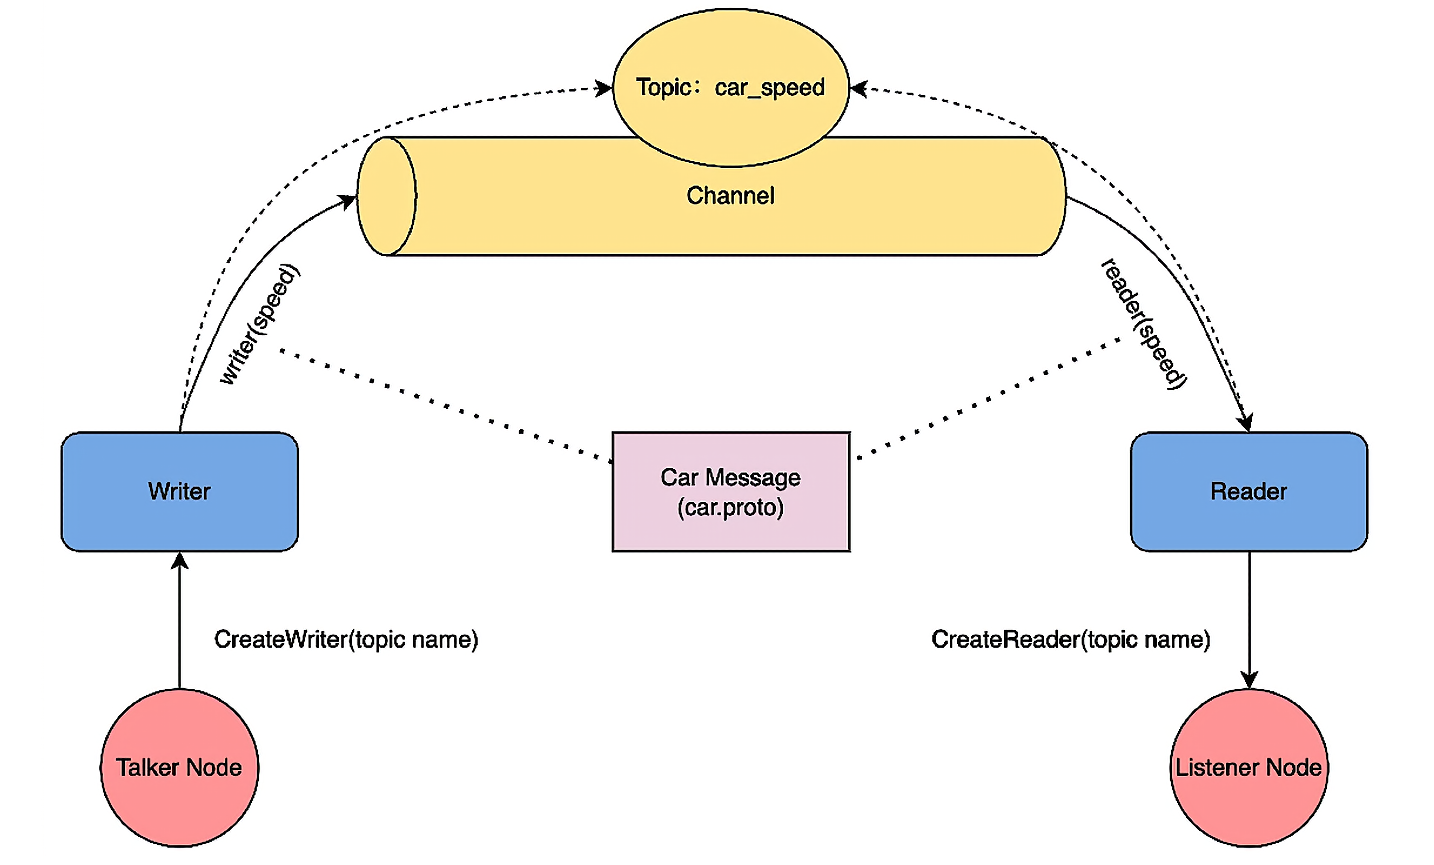
二、基于Write/Reader的通信方式
1. 概念
- Node:是整个数据拓扑网络中的基本单元,可以根据需求创建和管理Writer、Reader、Service、Client
- Writer:发布订阅模式中的发布者
- Reader:发布订阅模式中的订阅者
- Channel:通信中的topic,通过channel连接发布者和订阅者
- Message:通信的类型和数据结构(proto)
Apollo采用Google的protobuf
2. 优势及应用场景
- 单向通信
- 高性能低延迟
3. protobuf
Google开发的跨语言和跨平台的序列化数据结构的方式,相比较传统的json和xml具有更多的优势
- 性能效率高
- 使用便捷:在大多数语言中均有支持protobuf的库,可以将序列化的数据封装成一个类,并具有一些常用的方法
- 跨语言跨平台
例如如下这个proto
1 | syntax = "proto2" // 使用 proto2 语法 |
4. 例子
三、基于Service/Client的通信方式
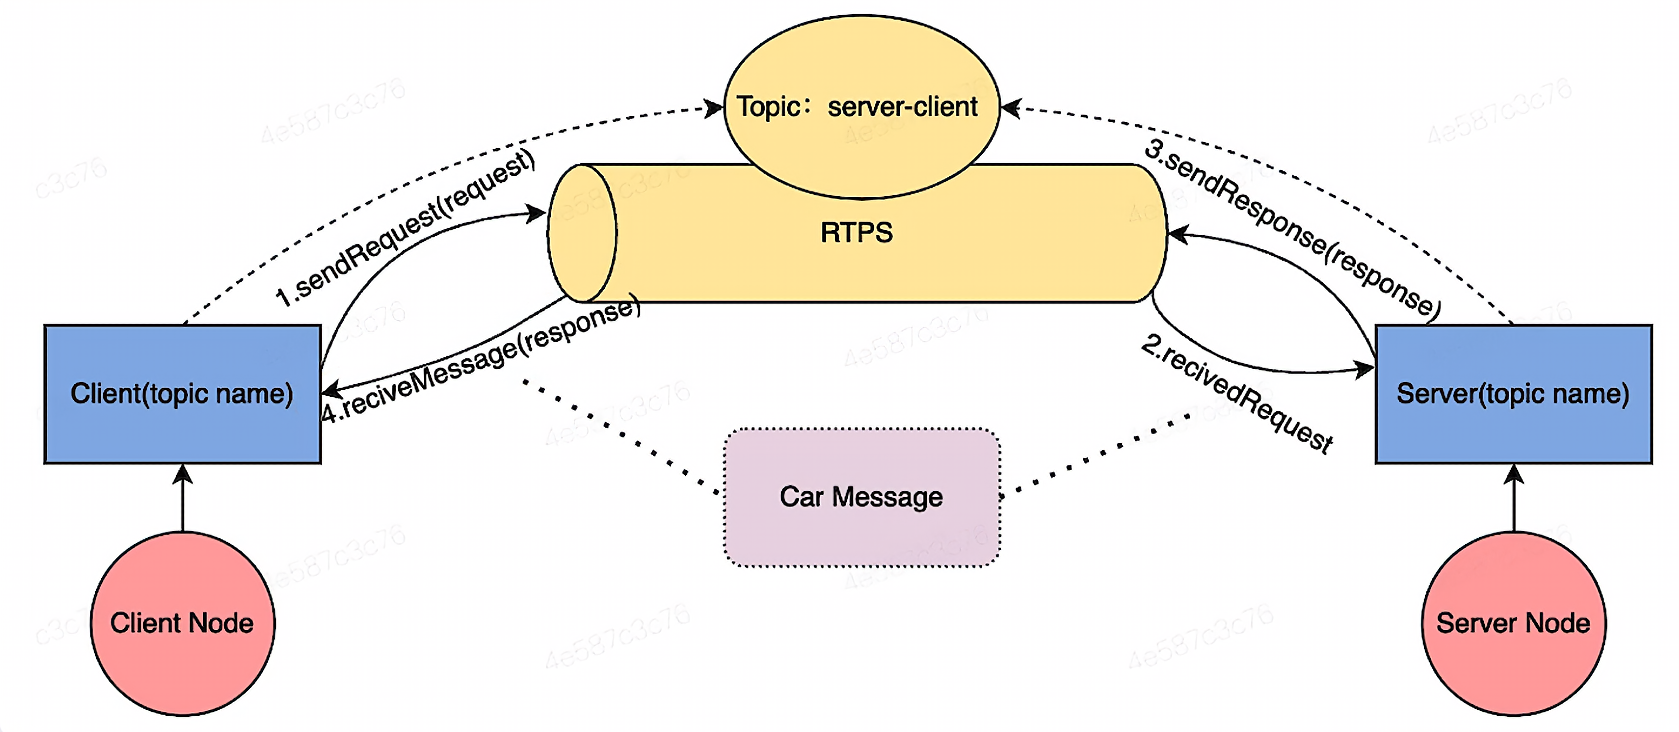
1. 概念
- Service: C/S下的服务端
- Client: C/S下的客户端
- RTPS:实时发布订阅协议
2. 优势及应用场景
- 双向通信
- 请求数据会有响应数据
- 跨进程、跨主机
3. 例子
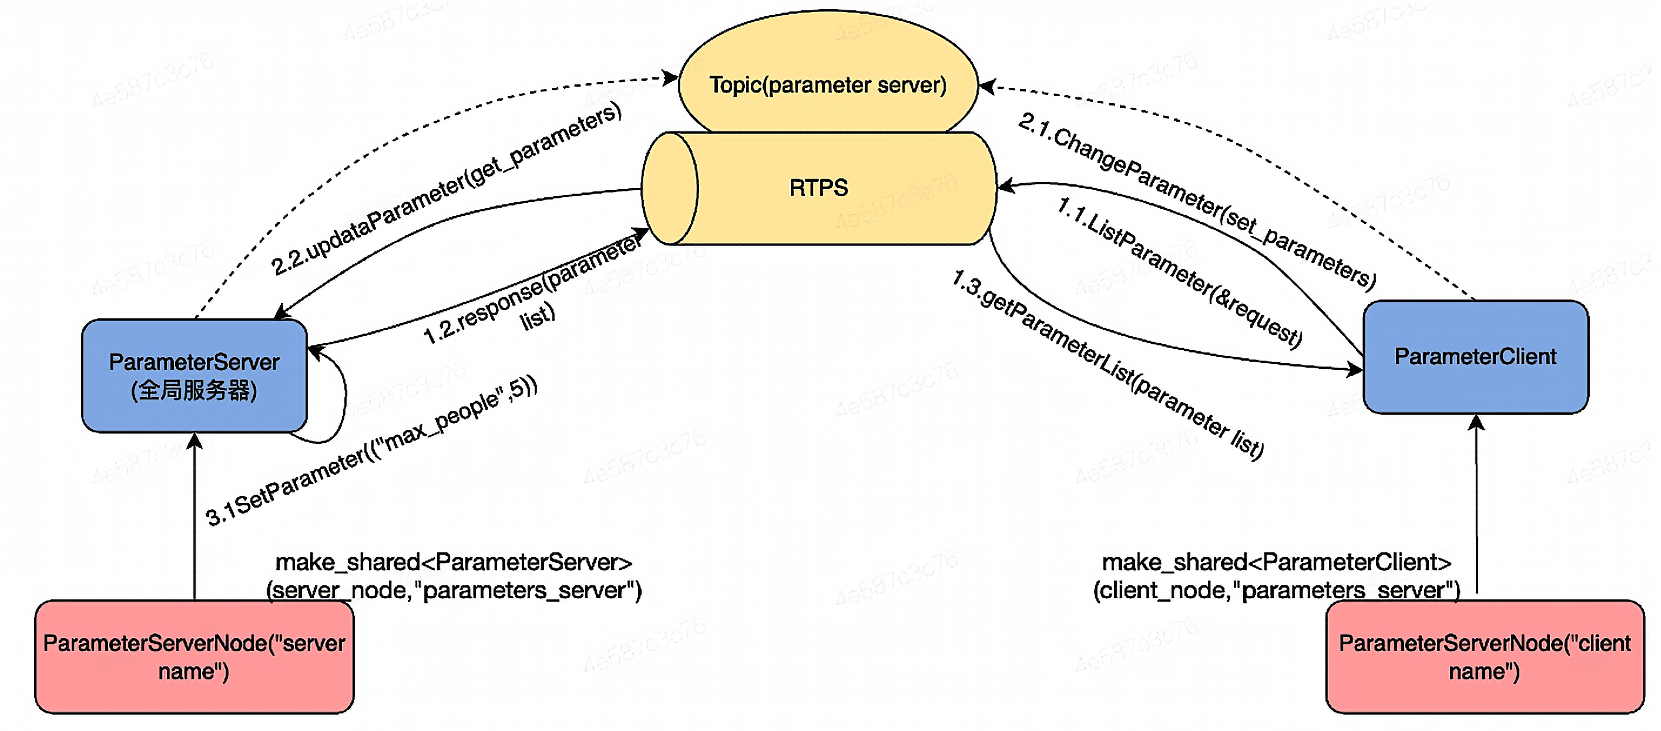
四、基于参数服务的通信方式
1. 概念
对C/S通信模式进行封装,实现全局配置参数共享的通信模式
parameterServer:参数服务器,存储全局参数parameterClient:参数客户端,获取与修改全局参数
2. 例子
五、实例Demo
talker-listener通信
0. 假设
假设我们需要发布当前车的名字,车牌和速度
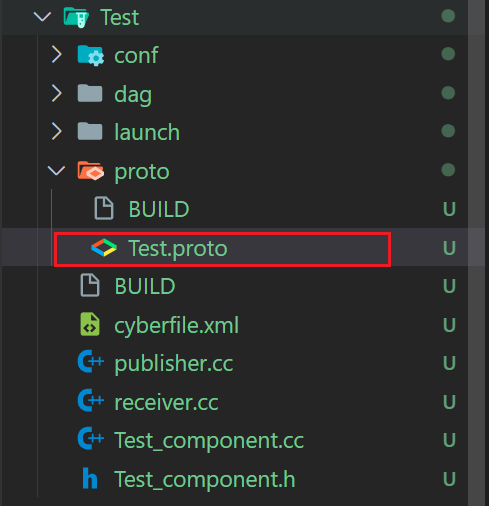
1. 创建component和必要文件
1 | buildtool create --template component Test |
可以看到当前文件夹下出现了一个新的目录Test
同时创建两个cpp文件,publisher.cc和receiver.cc
2. 创建需要传递的数据结构
打开相关的proto文件:
修改其中的数据结构:
1 | syntax = "proto2"; |
3. 发送方代码
publisher.cc
1 |
|
4. 接收方代码
receiver.cc
1 |
|
5. 修改bazel编译配置文件BUILD
1 | load("//tools:apollo_package.bzl", "apollo_cc_library", "apollo_cc_binary", "apollo_package", "apollo_component") |
接下来一步步解释这个bazel的build文件
(1). 导入
1 | load("//tools:apollo_package.bzl", "apollo_cc_library", "apollo_cc_binary", "apollo_package", "apollo_component") |
-
从
//tools:apollo_package.bzl文件中导入构建规则:apollo_cc_library:用于构建 C++ 库apollo_cc_binary:用于构建 C++ 可执行文件apollo_package:用于打包模块apollo_component:用于定义 Apollo 系统中的模块组件
-
从
//tools:cpplint.bzl文件中导入代码风格检查工具cpplint。
1 | package(default_visibility = ["//visibility:public"]) |
(2). 设置可见性
设置当前包中的所有目标对所有其他 Bazel 包可见,即这些构建目标可以被其他模块引用和使用。
//visibility:public表示公共可见性(类似于编程语言中的public关键字)。
(3). 定义二进制目标
1 | apollo_cc_binary( |
-
用途:构建名为
publisher和receiver的可执行程序。 -
依赖项解释
//cyber:依赖 CyberRT 通信模块(Apollo 通信系统的核心)。//Test/proto:Test_proto:依赖Test_proto,即由Test.proto编译生成的 C++ Protobuf 文件。 -
linkstatic = True使用静态链接,生成独立的可执行文件,避免运行时依赖问题。
(4). 打包 Apollo 模块
1 | apollo_package() |
- 用途:打包当前模块,便于发布和在 Apollo 系统中加载。
- 这通常是 Apollo 框架中的标准操作,生成
.so动态链接库或其他模块文件供调度使用。
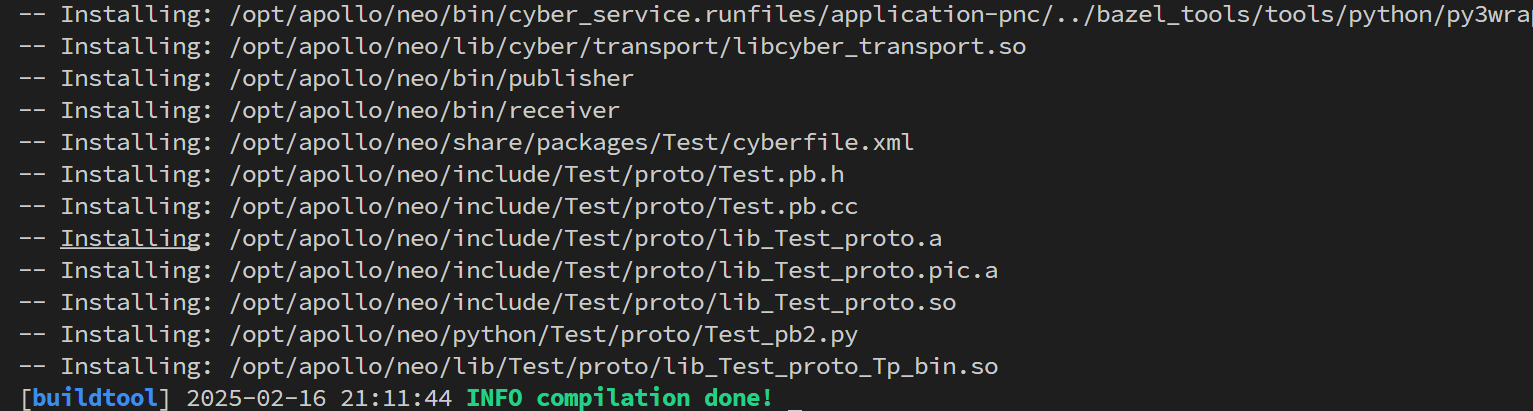
6. 编译
1 | buildtool build -p Test |
看到类似如下场景即为编译成功:
7. 测试运行
设置输出到控制台以方便看到结果:
1 | export GLOG_alsologtostderr=1 |
前往输出二进制程序的目录:
1 | cd /opt/apollo/neo/bin |
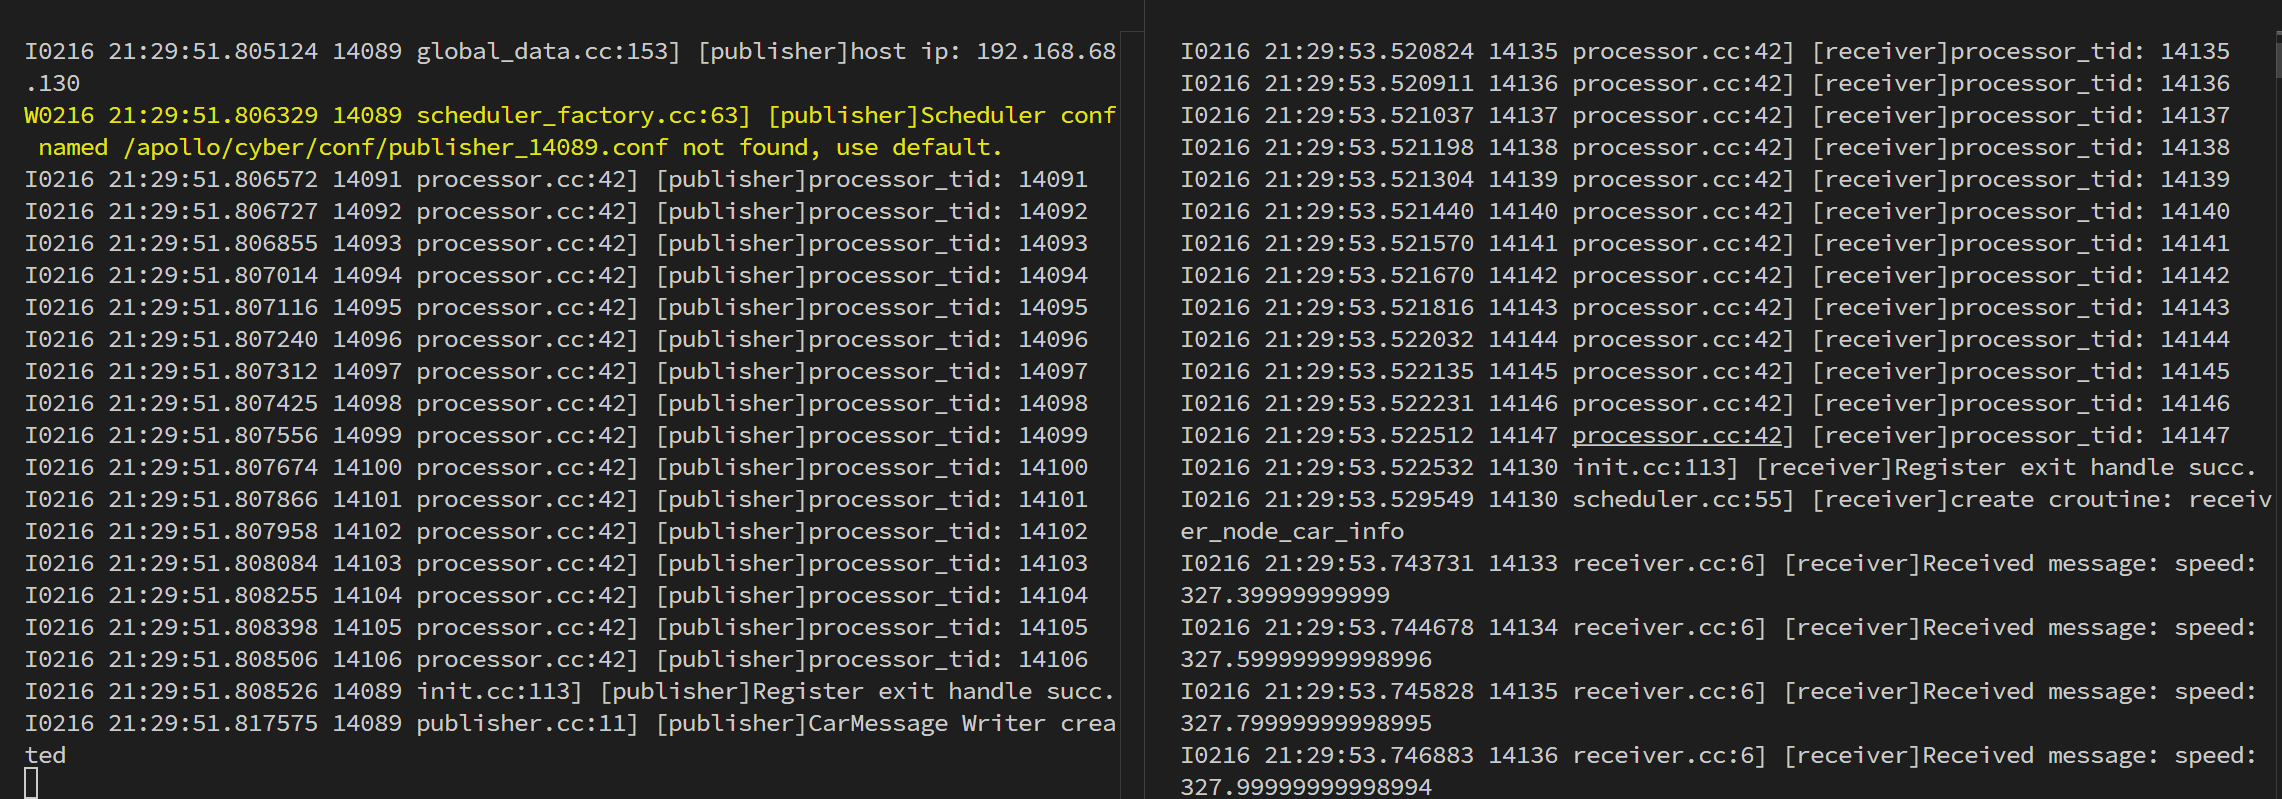
分别运行./receiver和./publisher,获得如下结果